You are at the right place to learn about the Jumpstarter project!
What is Jumpstarter?
Jumpstarter is a project to enable Hardware in the Loop testing for Edge devices.
Embedded and Edge devices have been traditionally tested in a manual way, with a human operator. This is not scalable, and it is not suitable for CI/CD pipelines,
i.e. GitHub CI, GitLab CI, Jenkins, (TekTon under development), etc.
In a modern development cycle we want to know that our software changes work well into our device hardware. We need to test the onboarding process, the software stack, the hardware, the updates and the interaction between all of them.
Why do I want it?
I need my software to be tested in real hardware for every new pull/merge request to my project.
I need my software to be tested for every new release or commit of my project.
I want my software to be automatically tested in newer versions of the hardware.
I have multiple variants of the hardware where my software needs to run, and I want to test them all.
I want a hands-free operation of hardware in my development environment, i.e. I don’t want to manually flash images, reboot the DUT, insert usb sticks,
manually interact with a bootloader, etc.
What is it good for?: Integrating your hardware edge devices into your software CI/CD pipeline.
What is it not good for?: Managing edge devices. Jumpstarter is not a device management tool, it is a testing tool.
What is it not yet good for?: Measuring power consumption of your device in combination with your software. This is a feature that we are working on.
This feature will enable you to get a power consumption report of your device in combination with your software, and will allow you to compare power consumption
before and after your changes.
Where should I go next?
1 - Getting Started
What do you need to get started with Jumpstarter?
To start using Jumpstarter you need a test-harness (i.e., a dutlink-board) and a device under test (DUT).
You will also need an image to flash into your DUT, it could be an .iso or a raw device image. In the case of the dutlink-board, this image
is flashed on a usb storage device which then can be attached to the DUT.
Installation
# install jumpstarter binarywget https://github.com/jumpstarter-dev/jumpstarter/releases/download/${JUMPSTARTER_VERSION}/jumpstarter-${JUMPSTARTER_VERSION}-linux-amd64.tar.gz
tar -xzf jumpstarter-${JUMPSTARTER_VERSION}-linux-amd64.tar.gz
exportPATH=${PATH}:$(pwd)
Setup
If you will be using a test harness that works through USB (like the dutlink-board), it is recommended to use a
physical host. QEMU is still possible but you will need to pass through the whole USB host controller to the VM, this
is recommended because the USB devices will come and go as devices are manipulated through the test-harness.
Hello World
You can use the
jumpstarter list-devices command to get a list of detected devices from your drivers.
1.1 - Concepts
In this section you can find a more detailed explanation of the concepts used in the Jumpstarter project.
Concept
Definition
Testing Harness
This is the physical device used to allow Jumpstarter interfacing into your hardware, one example of this is the dutlink-board
which is an Open Hardware reference design for Jumpstarter. But other Testing Harnesses can exist.
DUT
Device Under Test: This is the device that you connect to your
Serial console
Embedded devices and most servers have one or multiple serial consoles. A serial console allows you to transmit and receive bytes via
a TX and RX line (plus Ground), sometimes in RS-232 physical voltage levels, sometimes in digital voltage levels (i.e. 3.3v, 1.8v, etc..),
most bootloaders, UEFI bios, and the kernel can communicate through a serial console. i.e. the kernel accepts the
console parameter
to let you direct the main kernel output and console, for example using the kernel parameter
console=ttyS0,115200. In jumpstarter
we use the console as a the main communication method to Edge devices, with the purpose of monitoring and automation
2 - Reference
In this section you will find details on how to use Jumpstarter.
2.1 - Command line
Command line and scripting reference for Jumpstarter.
Jumpstarter today comes as a commandline tool that allows you to interact
with the test-harness via the driver architecture.
Jumpstarter CLI
Most commands accept a
device-id. A
device-id can be either
the
serial number of the device, or the
device name.
All commands accept the following flags
  -d, --driver string    Only devices for the specified driver
  -h, --help             help for jumpstarter
GENERAL COMMANDS
list-devices
This command will list all the devices that are currently available throught the various test-harness drivers.
$ jumpstarter list-devices
Device Name	Serial Number	Driver			Version	Device		Tags
orin-agx-00	e6058a05	dutlink-board	0.05	/dev/ttyACM2	orin-agx, orin, 64gb
xavier-nx-00	e6058905	dutlink-board	0.04	/dev/ttyACM1	nvidia, xavier-nx, nvidia-xavier, arm64, 8gb
visionfive2-00	031da453	dutlink-board	0.04	/dev/ttyACM0	rv64gc, rv64, jh7110, visionfive2, 8gb
list-drivers
This command lists all the drivers that are currently available.
$ jumpstarter list-drivers
dutlink-board
	OpenSource HIL USB harness (https://github.com/jumpstarter-dev/dutlink-board)
	enables the control of Edge and Embedded devices via USB.
	It has the following capabilities: power metering, power cycling, and serial console
	access, and USB storage switching.
run-script script.yaml
This is probably the most useful jumpstarter command today.
It runs a jumpstarter script, which will select a device based on the selector tags,
and execute all the steps of the script. Once finished or if an error occurs the
cleanup section of the script will be run.
$ jumpstarter run-script script.yaml
See the scripting section for a detailed guide on how to write
scripts and examples.
set-control device-id
Set a control signal from the test-harness to the device. This is used to control
signals on the DUT or trigger external hardware like video generators, simulated sensors,
fault injectors, or other necessary devices.
$ jumpstarter set-control orin-agx-00 A LOW
The signal names and output modes depend on the test-harness being used. See the
dutlink-board section for more details.
STORAGE MANAGEMENT
set-disk-image device-id
Set the disk image to be used for the DUT. This is used to write the disk image
to the DUT’s attacheable storage device. Images can be a raw disk image
or an ISO image.
Flags:
  -o, --offset-gb uint   Offset in GB to write the image to in the disk
You can limit or filter the devices found by jumpstarter for image writing by
using the storage_filter config. This configuration is stored into the test
harness board and will be used by jumpstarter to filter the devices found.
i.e. for using only /dev/disk/by-id/usb-SanDisk_Extreme_Pro_52A456790D93-0:0
you could set:
jumpstarter set-config device-id storage_filter Extreme_Pro_52A456790D93-0:0
This is also useful if your USB disk exposes multiple sub-devices.
attach-storage device-id
This command attaches the storage device to the DUT. This is normally required to boot the DUT.
power on|off|force-on|force-off|rescue device-id [-t] [-r] [-a]
This command manipulates the power status of a device
i.e.:
$ jumpstarter power off orin-agx-00
🔌 Powering off orin-agx-00... done
The different power actions available are:
Action
Description
on
Power on the device using the power_on profile from configuration
off
Power off the device using the power_off profile from configuration
force-on
Power on the device using only power, ignoring the profile from configuration
force-off
Power off the device using only power, ignoring the profile from configuration
rescue
Power on the device using the power_rescue profile from configuration
Flags:
  -a, --attach-storage   Attach storage before powering on
  -t, --console          Open console terminal after powering on
  -r, --reset            Reset device after power up
For information on how to configura the power profiles (power_on, power_off, power_rescue),
please see the set-config section.
reset device-id
Use the reset signal on the device to reset it, only open drain signal is supported (pulling low + high impedance) at this time.
$ jumpstarter reset orin-agx-00
⚡ Toggling reset on orin-agx-00
DEVICE CONSOLE
console device-id
This command provides a serial console to the DUT, it will connect to the serial console of the DUT and allow you to interact with it.
$ jumpstarter console orin-agx-00
Looking up for out-of-band console:  TOPOD83B461B-if01
💻 Entering console: Press Ctrl-B 3 times to exit console
[0000.219] I> FUSE_OPT_PVA_DISABLE = 0x00000000
...
...
...
create-ansible-inventory device-id
This command interacts with the console of the DUT
which must be logged in with a user andcreates an ansible inventory file for the DUT. This ansible inventory can
be used to run ansible playbooks against the DUT.
Flags:
  -k, --ssh-key string   The ssh key to use for the ansible inventory file
  -u, --user string      The user for the ansible inventory file (default "root")
run device-id command
Sends a string via the serial console to the DUT and waits for a response which is then written to stdout.
In the above example the system had already been logged
in via the console.
Flags:
  -w, --wait int        Wait seconds before trying to get a response (default 2)
CONFIGURATION
set-name device-id name
Changes device name. This is used to set a name for the test-harness device. This
should make devices easier to identify.
$ jumpstarter set-name e6058a05 orin-agx-00
✍ Changing device name for e6058a05 to orin-agx-00 ... done
set-tags device-id tag1 [tag2 …]
Changes device tags, pass one argument per tag. This is used to set tags for the test-harness device
which can be used to select specific devices from a script or some commands.
$ jumpstarter set-name orin-agx-00 orin-agx orin 64gb
✍ Changing device name for orin-agx-00 to orin-agx ... done
get-config device-id [key]
Shows the device configuration parameters stored on the test-harness board.
If a key is provided only the value for that key will be shown.
Changes a device configuration config parameter (see get-config).
if values is "" the config will be deleted.
usb_console config parameter
Changes device name for out of band USB console. Some devices expose a console only via USB
and the console is not accessible via pins. This command allows you to set a matching string
for the USB console of the device.
Jumpstarter will try to find the USB console device by matching the string provided with
this command when trying to communicate with the device via the console.
$ jumpstarter set-usb-console orin-agx-00 TOPOD83B461B-if01
✍ Changing usb_console name for orin-agx-00 to TOPOD83B461B-if01 ... done
power_on/off/recue parameters
These parameters are used to configure the power sequences, they are a comma separated list of
commands to be executed by the test-harness board to perform the power on/off/rescue of the device.
The commands are:
p1: power enable
p0: power disable
aL: pin A low
aH: pin A high
aZ: pin A high impedance
bL: pin B low
…
rL: pin RESET low
rH: pin RESET high
rZ: pin RESET high impedance
wN: wait N*100 ms, where N is a natural number.
Some examples of configuration for orin-nx/orin-agx devkit boards:
Touch power button for 500ms:
power_on: p1,bL,w5,bZ
Touch power button for 500ms (to make sure we start from ON), then touch for 11s.
power_off: p1,bL,w5,bZ,w10,bL,w110,bZ
Touch power button for 500ms (to make sure we start from ON), then assert
A (recovery), then assert the reset signal, and wait 500ms, then deassert reset,
wait 500ms, deassert A (recovery). This should put the jetson device into recovery mode.
power_rescue: p1,bL,w5,bZ,w1,aL,rL,w5,rZ,w5,aZ
where pin A is “REC” and pin B is “PWR” on the orin-agx/orin-nx boards.
2.2 - Jumpstarter scripts
See your project in action!
Jumpstarter scripts come in yaml form. They are used to describe the steps to be taken to deploy a
project into an Edge system and perform console interactions with it.
Using a script
Scripts can be executed using the run-script command,
a script has a selector to pickup an available device connected
to the jumpstarter host. The selector
specifies all the tags the device must have.
$ jumpstarter run-script script.yaml
Jumpstarter will fail if there are no available devices with the specified tags.
i.e.:
$ jumpstarter list-devices
Device Name	Serial Number	Driver			Version	Device		Tags
orin-nx-00	e605c805	dutlink-board	0.05	/dev/ttyACM2	orin-nx, orin, 16gb
xavier-nx-00	e6058905	dutlink-board	0.04	/dev/ttyACM1	nvidia, xavier-nx, nvidia-xavier, arm64, 8gb
visionfive2-00	031da453	dutlink-board	0.04	/dev/ttyACM0	rv64gc, rv64, jh7110, visionfive2, 8gb
if we run one of the examples
available in the jumpstarter repository we should see:
$ sudo jumpstarter run-script script-examples/orin-agx.yaml
⚙ Using device "orin-nx-00" with tags [orin-nx orin 16gb]

➤ Powering off and writing the image to disk
➤ Step ➤ power: "off"
[✓] done

➤ Step ➤ set-disk-image
🔍 Detecting USB storage device and connecting to host: done
📋 rhel-guest-image.raw -> /dev/disk/by-id/usb-SanDisk_Extreme_Pro_52A456790D93-0:0 offset 0x0:
💾 1280 MB copied 289.22 MB/s

...
Please note the call via sudo. Jumpstarter needs access to block storage devices and serial ports. While
serial port access can be granted adding the user to the dialout group, block storage access requires
root privileges.
This command is typically used from CI scripts, storing an image building and a jumpstarter script along your software project.
Script structure
name:"Name of your script"selector:- tagexpect-timeout:60steps:- ....cleanup:- ....
A script has a name, a selector, and a expect-timeout as main fields:
Field
Description
name
Just a descriptive name for the script
selector
A list of tags to find a compatible board from those available on the host
expect-timeout
This is the default timeout for expect steps
Script step commands
- comment
This is the simplest, will print a comment into the console during execution.
steps:- comment:"Powering off and writing the image to disk"
results in:
➤ Powering off and writing the image to disk
- pause
This command pauses execution for the specified amount of seconds.
steps:- pause:5
results in:
➤ Step ➤ pause: 5
[✓] done
- power
Enables power control of the device, accepted orders are:
on
off
cycle : power off and on again
steps:- power:"on"
results in:
➤ Step ➤ power: "on"
[✓] done
- reset
Toggles the /RESET line of the dutlink-board, this will reset the DUT.
steps:- reset:time_ms:500
results in:
➤ Step ➤ reset
Resetting device...
[✓] done
- set-disk-image
Writes a disk image into the storage device attached to jumpstarter in connector J9.
It accepts multiple parameters:
Parameter
Description
image
The image .iso/.raw that must be in a bootable format for the DUT
attach_storage
true/false bool, if we want to attach the storage right away
offset_gb
if we want to store the image at an specific offset of the disk (in GB)
i.e.:
steps:- set-disk-image:image:"rhel-image.raw"
results in:
➤ Step ➤ set-disk-image
🔍 Detecting USB storage device and connecting to host: done
📋 rhel-image.raw -> /dev/disk/by-id/usb-SanDisk_Extreme_Pro_52A456790D93-0:0 offset 0x0:
💾 10240 MB copied 287.80 MB/s
[✓] done
- storage
Allows attaching or detaching the USB storage from the DUT.
Accepted orders are:
attach
detach
i.e.:
steps:- storage:attach
results in:
➤ Step ➤ storage: "attach"
[✓] done
- expect
Waits for a string to be received before continuing to next steps. It accepts multiple parameters:
Parameter
Description
this
The string we are expecting on the console before we can continue
echo
true/false bool, if we want to echo the received data, useful for debugging and logging
timeout
seconds to wait for the expected string before failure, it defaults to expect-timeout from the script yaml
debug_escapes
true/false bool, transforms ESC terminal control sequences into text to avoid terminal manipulation
➤ Step ➤ expect: "login: "
....
....
<ESC>[0;1;39mRotate log files
<ESC>[0m.
[   44.674563] block sda: the capability attribute has been deprecated.
[   44.678058] WARNING! power/level is deprecated; use power/control instead

Red Hat Enterprise Linux 9.3 (Plow)
Kernel 5.14.0-362.8.1.el9_3.aarch64 on an aarch64

Activate the web console with: systemctl enable --now cockpit.socket

localhost login:
➤ Step ➤ ...
- send
Sends a list of strings to the device one after another with a delay between them. It accepts multiple parameters:
Parameter
Description
this
The list of strings to be sent to the device
delay_ms
millisecond delay between strings. Defaults to 100ms
echo
true/false bool, if we want to echo the received data, useful for debugging and logging; but consumes output that could be needed in a later expect command (bug)
debug_escapes
true/false bool, transforms ESC terminal control sequences into text to avoid terminal manipulation
strings can contain any of the following sequences and they will be converted
into the corresponding control characters:
<ESC>, <F1>, <F2>, <F3>, <F4>, <F5>, <F6>, <F7>, <F8>, <F9>, <F10>, <F11>,
<UP>, <DOWN>, <LEFT>, <RIGHT>, <ENTER>, <TAB>, <BACKSPACE>, <DELETE>,
<CTRL-A>, <CTRL-B>, <CTRL-C>, <CTRL-D>, <CTRL-E>
- write-ansible-inventory
This action assumes that the serial console is past login and it is ready to be used.
It will create an ansible inventory file for the DUT. This ansible inventory can
be used to run ansible playbooks against the DUT, as long as the DUT is connected
to a shared network with the jumpstarter host.
It accepts multiple parameters:
Parameter
Description
filename
The filename for the ansible inventory file, defaults to inventory
ssh_key
The ssh key to use for the ansible inventory file, defaults to ~/.ssh/id_rsa
user
The user for the ansible inventory file, defaults to root
If you had previously generated an inventory with write-ansible-inventory.
2.3 - Script examples
Jumpstarter scripts in action
The jumpstarter scripting language allows automation of the test process.
The following example is a script that will deploy a RHEL image that
has been built for the device, it contains a set of kernel modules
that need testing, and an updated kernel in a local repository.
name:"Test Jetson kmods"selector:- orinexpect-timeout:60steps:- comment:"Powering off and writing the image to disk"- power:off- set-disk-image:image:"rhel-guest-image.raw"- storage:attach- comment:"Booting up and waiting for login prompt"- power:on- expect:this:"login: "debug_escapes:truetimeout:250- send:this:- "root\n"- "redhat\n"- pause:3- expect:this:"[root@localhost ~]#"debug_escapes:false- comment:"Updating kernel if necessary and installing the jetpack kmods"- send:echo:truethis:- "sudo dnf update -y\n"- expect:timeout:120echo:truedebug_escapes:falsethis:"Complete"- expect:debug_escapes:falsethis:"[root@localhost ~]#"- send:echo:truethis:- "sudo dnf install -y nvidia-jetpack-kmod\n"- expect:timeout:120echo:truedebug_escapes:falsethis:"Complete"- comment:"Rebooting to get latest kernel and kmods"- send:debug_escapes:falsethis:- "reboot\n"- expect:this:"login: "debug_escapes:falsetimeout:300# the kmod boot takes very long because of some issues with the crypto modules from nvidia- send:this:- "root\n"- "redhat\n"- send:echo:false# we dont want to capture any of the output so expect will catch it laterthis:- "\n"- "\n"- expect:debug_escapes:falseecho:truethis:"[root@localhost ~]#"- comment:"verifying that the kmods are loaded"- send:echo:false# we dont want to capture any of the output so expect will catch itthis:- "lsmod | grep --color=never nv\n"- expect:echo:truethis:"nvgpu"- comment:"Creating an inventory for this device and continuing with ansible"- write-ansible-inventory:filename:"inventory.yaml"ssh_key:~/.ssh/id_rsa- local-shell:script:| ansible -m ping -i inventory.yaml allcleanup:- comment:"Powering off and detaching the disk"- send:debug_escapes:falsethis:- "poweroff\n"- pause:5- power:off- storage:detach
The output for this script would look as follows:
$ sudo ./jumpstarter set-disk-image visionfive2-00 rhel-guest-image.raw
💾 Writing disk image for visionfive2-00
🔍 Detecting USB storage device and connecting to host: <c^C
[gitlab-runner@localhost jumpstarter]$ ^C
[gitlab-runner@localhost jumpstarter]$ sudo ./jumpstarter run-script script-examples/orin-agx.yaml
⚙ Using device "orin-nx-00" with tags [orin-nx-00 orin orin-nx 16gb]
➤ Powering off and writing the image to disk
➤ Step ➤ power: "off"
[✓] done
➤ Step ➤ set-disk-image
🔍 Detecting USB storage device and connecting to host: done
📋 rhel-guest-image.raw -> /dev/disk/by-id/usb-SanDisk_Extreme_Pro_52A456790D93-0:0 offset 0x0:
💾 10240 MB copied 272.79 MB/s
[✓] done
➤ Step ➤ storage: "attach"
[✓] done
➤ Booting up and waiting for login prompt
➤ Step ➤ power: "on"
[✓] done
➤ Step ➤ expect: "login: "
040000 (0xe580)
[0000.414] I> RAM_CODE 0x4000401
[0000.420] I> RAM_CODE 0x4000401
[0000.423] I> Task: Load Page retirement list (0x500115dd)
[0000.429] I> Task: SDRAM params override (0x50012279)
[0000.433] I> Task: Save mem-bct info (0x5001542d)
[0000.438] I> Task: Carveout allocate (0x50015315)
...
...
...... Booting `Red Hat Enterprise Linux (5.14.0-362.6.1.el9_3.aarch64) 9.3
(Plow)'
EFI stub: Booting Linux Kernel...
EFI stub: Using DTB from configuration table
EFI stub: Exiting boot services...
[ 0.000000] Booting Linux on physical CPU 0x0000000000 [0x410fd421]
[ 0.000000] Linux version 5.14.0-362.6.1.el9_3.aarch64 (mockbuild@arm64-026.build.eng.bos.redhat.com) (gcc (GCC) 11.4.1 20230605 (Red Hat 11.4.1-2), GNU ld version 2.35.2-42.el9) #1 SMP PREEMPT_DYNAMIC Fri Sep 29 13:05:29 EDT 2023
...
...
localhost login:
➤ Step ➤ send
sent: root
root
Password:
sent: redhat
➤ Step ➤ pause: 3
[✓] done
➤ Step ➤ expect: "[root@localhost ~]#"
[root@localhost ~]#
➤ Updating kernel if necessary and installing the jetpack kmods
➤ Step ➤ send
sent: sudo dnf update -y
sudo dnf update -y
<ESC>[?2004l
➤ Step ➤ expect: "Complete"
jetson-packages 3.1 MB/s | 519 kB 00:00
Dependencies resolved.
================================================================================
Package Arch Version Repository Size
================================================================================
Installing:
kernel aarch64 5.14.0-362.8.1.el9_3 jetson-packages 5.1 M
kernel-core aarch64 5.14.0-362.8.1.el9_3 jetson-packages 18 M
kernel-modules aarch64 5.14.0-362.8.1.el9_3 jetson-packages 23 M
kernel-modules-core aarch64 5.14.0-362.8.1.el9_3 jetson-packages 26 M
Transaction Summary
================================================================================
Install 4 Packages
Total size: 73 M
Installed size: 110 M
Downloading Packages:
Running transaction check
Transaction check succeeded.
Running transaction test
Transaction test succeeded.
Running transaction
Preparing : 1/1
Installing : kernel-modules-core-5.14.0-362.8.1.el9_3.aarch64 1/4
Installing : kernel-core-5.14.0-362.8.1.el9_3.aarch64 2/4
Running scriptlet: kernel-core-5.14.0-362.8.1.el9_3.aarch64 2/4
Installing : kernel-modules-5.14.0-362.8.1.el9_3.aarch64 3/4
Running scriptlet: kernel-modules-5.14.0-362.8.1.el9_3.aarch64 3/4
Installing : kernel-5.14.0-362.8.1.el9_3.aarch64 4/4
Running scriptlet: kernel-modules-core-5.14.0-362.8.1.el9_3.aarch64 4/4
Running scriptlet: kernel-core-5.14.0-362.8.1.el9_3.aarch64 4/4
Running scriptlet: kernel-modules-5.14.0-362.8.1.el9_3.aarch64 4/4
Running scriptlet: kernel-5.14.0-362.8.1.el9_3.aarch64 4/4
Verifying : kernel-5.14.0-362.8.1.el9_3.aarch64 1/4
Verifying : kernel-core-5.14.0-362.8.1.el9_3.aarch64 2/4
Verifying : kernel-modules-5.14.0-362.8.1.el9_3.aarch64 3/4
Verifying : kernel-modules-core-5.14.0-362.8.1.el9_3.aarch64 4/4
Installed:
kernel-5.14.0-362.8.1.el9_3.aarch64
kernel-core-5.14.0-362.8.1.el9_3.aarch64
kernel-modules-5.14.0-362.8.1.el9_3.aarch64
kernel-modules-core-5.14.0-362.8.1.el9_3.aarch64
Complete
➤ Step ➤ expect: "[root@localhost ~]#"
!
[root@localhost ~]#
➤ Step ➤ send
sent: sudo dnf install -y nvidia-jetpack-kmod
sudo dnf install -y nvidia-jetpack-kmod
<ESC>[?2004l
➤ Step ➤ expect: "Complete"
Last metadata expiration check: 0:01:02 ago on Wed Oct 11 09:39:12 2023.
Dependencies resolved.
==========================================================================================
Package Arch Version Repository Size
==========================================================================================
Installing:
nvidia-jetpack-kmod aarch64 6.0.0_pre_ea_5.14.0_362-3.el9_3 jetson-packages 47 M
Installing dependencies:
nvidia-jetpack-firmware aarch64 6.0.0_pre_ea-3.el9 jetson-packages 659 k
nvidia-jetpack-modprobe aarch64 6.0.0_pre_ea-3.el9 jetson-packages 12 k
Transaction Summary
==========================================================================================
Install 3 Packages
Total size: 48 M
Installed size: 318 M
Downloading Packages:
Running transaction check
Transaction check succeeded.
Running transaction test
Transaction test succeeded.
Running transaction
Preparing : 1/1
Installing : nvidia-jetpack-modprobe-6.0.0_pre_ea-3.el9.aarch64 1/3
Installing : nvidia-jetpack-firmware-6.0.0_pre_ea-3.el9.aarch64 2/3
Installing : nvidia-jetpack-kmod-6.0.0_pre_ea_5.14.0_362-3.el9_3. 3/3
Running scriptlet: nvidia-jetpack-modprobe-6.0.0_pre_ea-3.el9.aarch64 3/3
Running scriptlet: nvidia-jetpack-kmod-6.0.0_pre_ea_5.14.0_362-3.el9_3. 3/3
Verifying : nvidia-jetpack-firmware-6.0.0_pre_ea-3.el9.aarch64 1/3
Verifying : nvidia-jetpack-kmod-6.0.0_pre_ea_5.14.0_362-3.el9_3. 2/3
Verifying : nvidia-jetpack-modprobe-6.0.0_pre_ea-3.el9.aarch64 3/3
Installed:
nvidia-jetpack-firmware-6.0.0_pre_ea-3.el9.aarch64
nvidia-jetpack-kmod-6.0.0_pre_ea_5.14.0_362-3.el9_3.aarch64
nvidia-jetpack-modprobe-6.0.0_pre_ea-3.el9.aarch64
Complete
➤ Rebooting to get latest kernel and kmods
➤ Step ➤ send
sent: reboot
!
reboot
➤ Step ➤ expect: "login: "
[root@localhost ~]# reboot
[root@localhost ~]#
Red Hat Enterprise Linux 9.3 (Plow)
Kernel 5.14.0-362.8.1.el9_3.aarch64 on an aarch64
Activate the web console with: systemctl enable --now cockpit.socket
localhost login:
➤ Step ➤ send
sent: root
root
Password:
sent: redhat
➤ Step ➤ send
sent:
sent:
➤ Step ➤ expect: "[root@localhost ~]#"
Last login: Wed Oct 11 09:39:04 on ttyTCU0
[root@localhost ~]#
➤ verifying that the kmods are loaded
➤ Step ➤ send
sent: lsmod | grep --color=never nv
➤ Step ➤ expect: "nvgpu"
<ESC>[?2004l
<ESC>[?2004h[root@localhost ~]#
<ESC>[?2004l
<ESC>[?2004h[root@localhost ~]# lsmod | grep --color=never nv
nvgpu[?2004l
➤ Creating an inventory for this device and continuing with ansible
➤ Step ➤ write-ansible-inventory

written : inventory.yaml
➤ Step ➤ local-shell
+ ansible -m ping -i inventory.yaml all
orin-nx-00 | SUCCESS => {
    "ansible_facts": {
        "discovered_interpreter_python": "/usr/bin/python3"
    },
    "changed": false,
    "ping": "pong"
}
➤ Cleanup ➤ Test Jetson kmods
➤ Powering off and detaching the disk
➤ Step ➤ send
sent: poweroff
poweroff
[root@localhost ~]#
Stopping Session 1 of User root...
Stopping Session 3 of User root...
➤ Step ➤ pause: 5
[✓] done
➤ Step ➤ power: "off"
[✓] done
➤ Step ➤ storage: "detach"
[✓] done
3 - Test harness
A test harness is a device that enables jumpstarter to manage a DUT via a jumpstarter-driver.
Jumpstarter provides a driver architecture to enable the easy contribution of additional test harnesses,
but today only the dutlink-board is supported.
We recognize that the dutlink-board could help test many general edge devices, but complex
devices may require a custom test harness, and we also understand that customers may have
already their own harnesses in place. One of our design goals was to make it very easy
to add new test harnes drivers to Jumpstarter.
3.1 - DUTlink board
Information about the DUTlink board, how to use it and how to connect it to your DUT.
The dutlink-board is a test harness designed for Jumpstarter, it’s a board in micro ITX
format, which allows mounting of a DUT on top, and enables the usage of standard rack or desktop
server cases.
The dutlink-board is an Open Hardware project, you can find the design files in the
DUTlink board repository, a first batch
was built by SeeedStudio using their fusion PCB service, and you can find the manufacturing files
here.
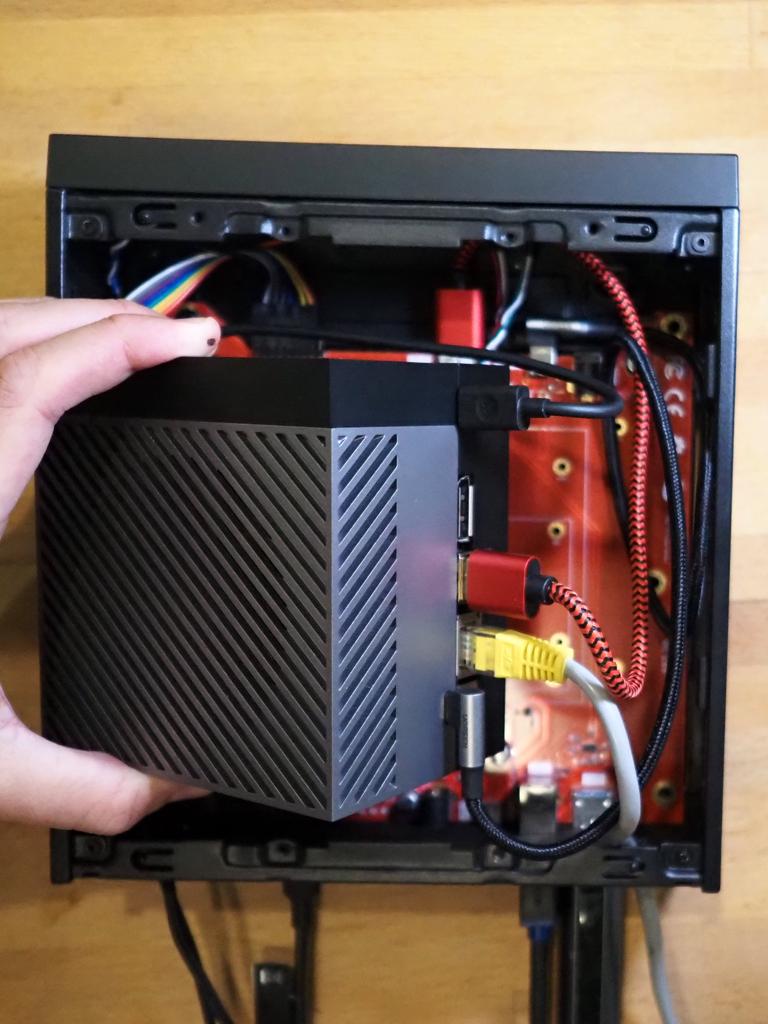
High level overview
A device under test (left side) is connected to the dutlink board, which is connected to a
host (right side) via USB-C. The host runs the jumpstarter software, which allows CI to
interact with the DUT, controlling the power, connection and management of a storage device
(see the pendrive in the next pictures), and communication via serial console.
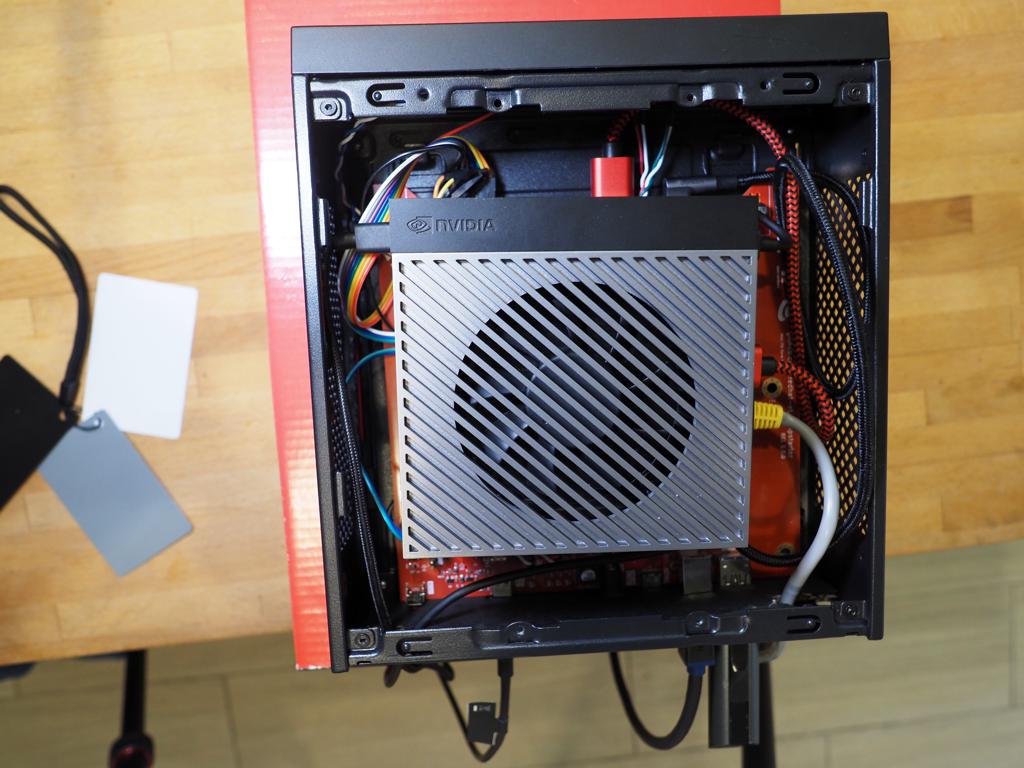
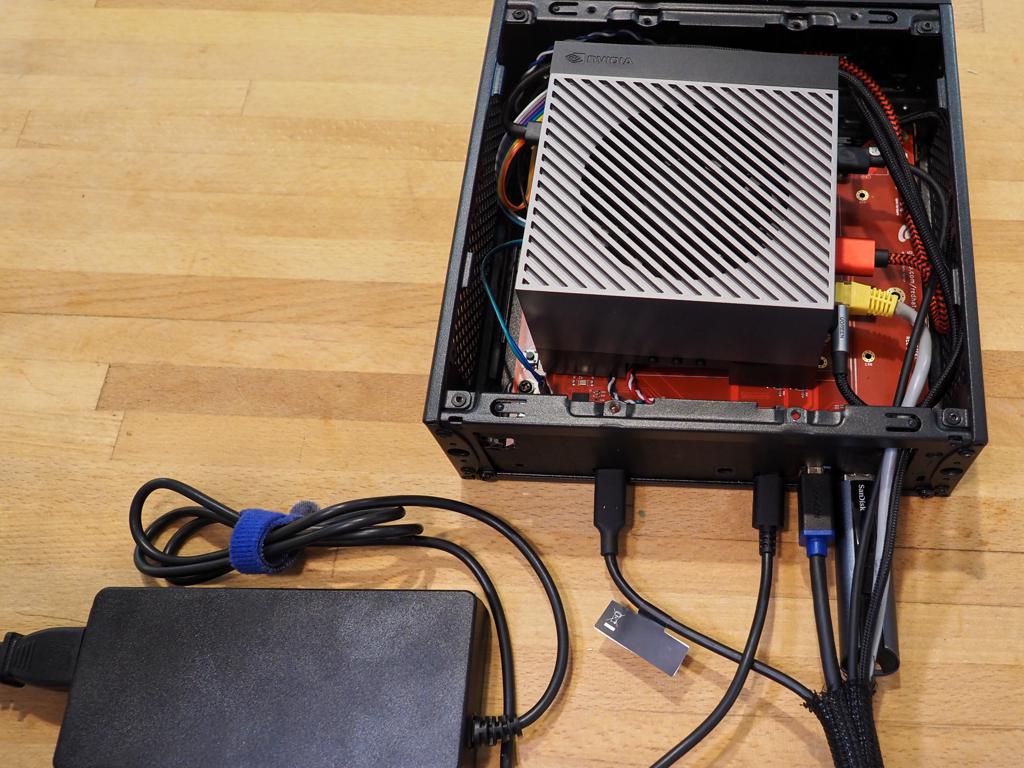
This is how the hardware looks
Top view of the dutlink board REL-1.0.0
On the left area: you can see connections to the Device Under Test
On the right, you can see the connections to the testing
host, where the jumpstarter software runs.
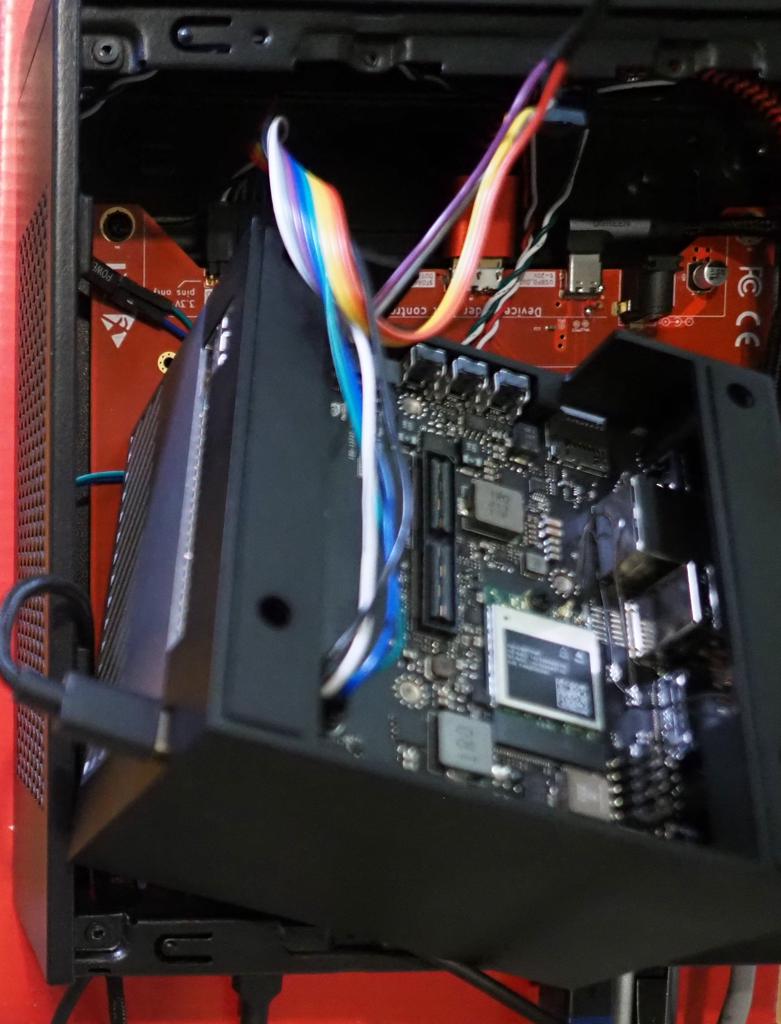
Top view of the dutlink board REL-1.0.0 with a visionfive2 board attached
via USB-PD power pass-through. See more details in the visionfive2 section.
Warnings: read before you use the board
Barrel power connectors and USB-PD power pass-through
CE and FCC certification is still pending (the labels on the board are still incorrect). This is a still a prototype, and it has not been certified yet.
Barrel power connectors have a polarity, with the positive pin in the center, and the negative pin on the outside. If you connect the barrel power connector with the wrong polarity, you will damage the board.
USB-PD power pass-through and Barrel power should not be used at the same time, as this will damage the board or your power adapters.
Digital signals on the I/O connector are 3.3V only
The I/O connector has digital signals, but they are 3.3V only, this is generally ok if you use 0 or HiZ outputs,
but never use a HI/H/1 signal on an output when the target device is only 1.2, 1.8 or 2.5V, as this could damage the device.
Outputs are protected with a 100 ohm resistor which would avoid damage in most cases.
The V IO pin is provided to enable the use of voltage translation circuits if necessary.
Known issues and limitations
USB-C connections
USB-C connections are reversable, but in the 1.0.0 version of the board, the USB-C receptacles have not been wired properly, so in some cases you may need to flip the USB-C cable to get the connection or power working, this applies to all USB-Cs on the board.
i.e.:
dutlink-board is not being detected by the host: try flipping the USB-C cable.
the device is not powered-up or charging: try flipping the power USB-C cable.
Storage DUT Out connector is fragile
The USB storage connector used to connect to the DUT is fragile, avoid pressing up or down
from the cables or connectors once attached to the board, as this could rip the connector
from the board. Once the board is tested glue could be carefully applied to the back of the connector.
3.1.1 - Orin NX Devkit + DutLink
Manual for connecting the dutlink board to the Orin AGX devkit.
This is a graphical guide describing how to connect an NVIDIA Orin AGX Devkit
to the dutlink-board.
This setup will use 4 USB connections to your host:
Jumpstarter control
Jumpstarter USB3 storage
NVIDIA Flashing USBC or microUSB port
Wiring table
Name
NX Devkit Connector
Jumpstarter Connector
Host connector
Comments
GND
(J14) pin 7
(I/O) GND
Connecting signal ground
/FORCE_REC
(J14) pin 10
(I/O) CTL_A
Force recovery mode signal (active low)
SLEEP/WAKE
(J14) pin 12
(I/O) CTL_B
Power down [>10s], Power up [short] (active low)
/SYS_RESET
(J14) pin 8
(I/O) RESET
Reset signal (active low)
RCM
(J5) USB-C or microUSB connector
USB
NVIDIA Flashing interface for RCM
DUT-STORAGE
(J7-J6) USB 3.2 Gen1
J8
USB storage attachment to DUT
DUT-POWER
POWER JACK
J3
Power output for the DUT
ETHERNET
Ethernet
Connect to a network where the host is also connected
JUMPSTARTER
P1 USB-C
USB
Jumpstarter control USB bus, used by the jumpstarter software to talk to the
dutlink-board
HOST-STORAGE
J7 USB-B 3.0
USB
Host access to USB storage, used to write the USB disk
DISK
J9 USB-A 3.0
Connect a pen-drive or disk here. USB3.1 Gen1 (5Gbps recommended, Gen2 10Gbps don't work well yet)
POWER-4-DUT
J2 BARREL JACK POWER
Connect the Orin NX Devkit power adapter here
Troubleshooting
My console doesn’t show anything
See the Console access section and clear any previous configuration for the USB console.
The system won’t boot from the USB disk
You need to go into the UEFI BIOS and change the boot order to setup “new devices”
as the first boot option. Make sure that the USB devices is found.
Make sure that you are not using a USB3.1 Gen2 device (10Gbps), as this is not supported yet.
This means that we will use the power control directly, without using the power button as it’s not necessary for this
board. The flashing mode is activated by setting force recovery signal to low aL, then asserting reset rL, and then
waiting for 1 second w1, then releasing the reset signal rZ, waiting another second w1, and then releasing the
force recovery signal aZ.
Console access
The Orin NX Devkit the UEFI console only on the 40pin port, so any necessary UEFI settings must be performed
on that port first.
You must clear the previous usb console settings if this board was used with an AGX
$ jumpstarter set-usb-console orin-nx-00 ""
3.1.2 - Connector reference
Connector reference for te dutlink-board
Device Under Test connections
Power
Connector
Definition
J3
J3 is a barrel jack connector that provides power output to the DUT. The source
of the power comes from J1.
Warning: Do not use at the same time as J5 or J2.
J5
J5 is a USB-C connector that provides power output to the DUT. The source of the
power comes from J2, USB-PD negotiation is connected to the power adapter on J2. USB-PD is a standard that allows negotiation of the voltage and current.
Warning: Do not use at the same time as J3 or J1.
Storage
Connector
Definition
J8
J8 is a USB3 micro B connector for storage. This connector provides access to
the storage device that is connected to J9.
One possible cable you can use in this connector is this one: link
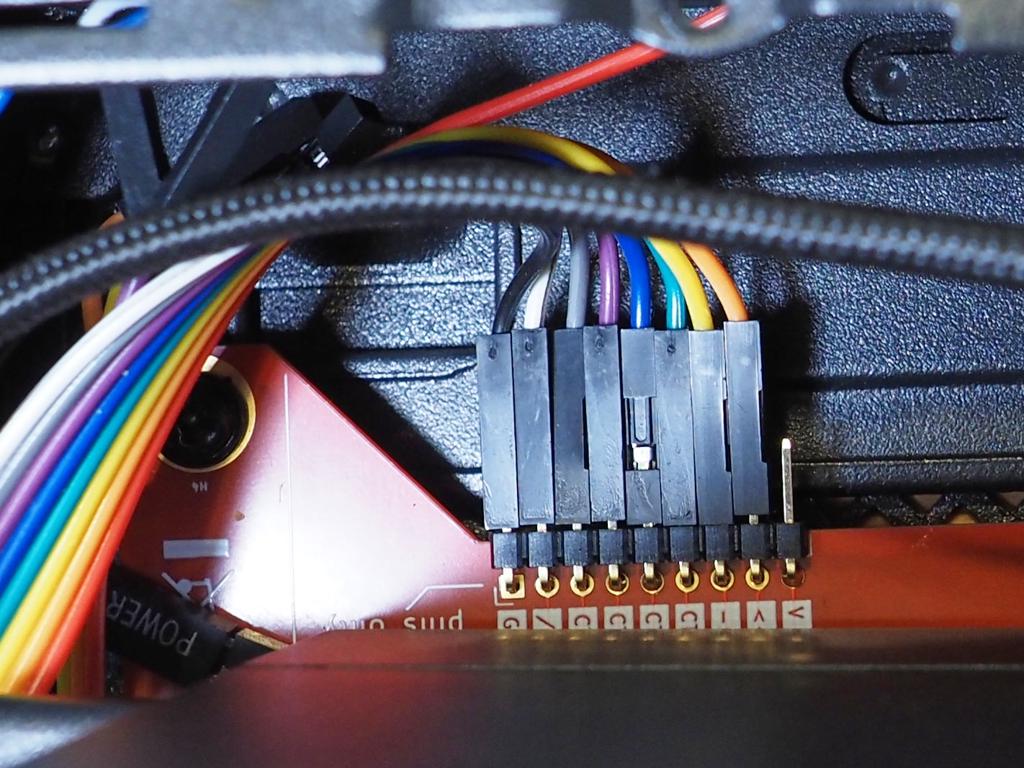
I/O pins
The I/O pins connector provides a 3.3V digital interface to the DUT, or any surrounding
test hardware (like video signal generators, sensor emulators, or other elements).
Never use a HI/H/1 signal on an output when the target device is only 1.2, 1.8 or 2.5V, as this could damage the device.
Outputs are protected with a 100 ohm resistor which would avoid damage in most cases.
The V IO pin is provided to enable the use of voltage translation circuits if necessary.
Pin
Definition
V IO
Provides a voltage reference for a voltage translation circuit
TX
Provides an output UART to the DUT, this is connected to the jumpstarter console.
RX
Provides an input UART from the DUT, this is connected to the jumpstarter console.
CTL_A
Provides a digital input/output which can be controlled by the jumpstarter software.
The current convention is to use this pin for forcing devices into flashing mode,
but it can be used for any purpose.
CTL_B
Provides a digital input/output which can be controlled by the jumpstarter software.
CTL_C
Provides a digital input/output which can be controlled by the jumpstarter software.
CTL_D
Provides a digital input/output which can be controlled by the jumpstarter software.
/RESET
Provides a reset output signal which can be controlled from the jumpstarter
software. It's active low open collector output, this means that it will output
a '0' when the reset is asserted, and it will be in HiZ when the reset is not.
Power input connections
Connector
Definition
J1
J1 is a barrel jack connector where the power adaptor for the DUT must be connected. The
destination of this power is J3.
Warning: Do not use at the same time as J5 or J2. And please note that the center
pin is the possitive connection, power cannot be inverted.
J2
J2 is a USB-C connector that receives power for the DUT from the power adapter. The
destination is J5, USB-PD negotiation is connected between J2 and J5. Please note that
there is a bug in the 1.0.0 version of the board, and the USB-C receptacle is not wired
properly, so in some cases you may need to flip the USB-C cable to get the connection or
power working, this applies to all USB-Cs on the board.
Warning: Do not use at the same time as J3 or J1.
Host connections
Connector
Definition
P1
P1 is a USB-C connector that provides power and control to the Jumpstarter microcontroller,
once this is connected to the host jumpstarter must be detected by the kernel and a ttyACM device
must be detected.
J7
J7 is a USB3 B connector. This connector must be connected to the host, and it provides
access to the storage device connected to J9. One possible cable you can use in this
connector is this one: link
Other/notes
While not technically a part of the dutlink board, some DUTs need USB host
access to allow flashing from the host, i.e. NVIDIA Jetson boards. In some
cases multiple USB connections.
Storage Device
Connector
Definition
J9
J9 is a USB3 A connector, in this connector a storage device must be connected,
this device will be multiplexed between the host and the DUT. The HOST can flash
it, and the DUT can boot or install from this device.
Flashing speed will hugely depend on the storage device used, and while the
dutlink-board has been designed for 10Gbps USB3.2 Gen2, the speed will
depend on the storage device used as well as the cables connected to J8 and J7.
To stay on the safe side 5Gbps devices are recommended. One possible device
you can use for this purpose is: link
Manual for connecting the dutlink board to the Orin AGX devkit.
This is a graphical guide describing how to connect an NVIDIA Orin AGX Devkit
to the dutlink-board.
This setup will use 4 USB connections to your host:
Jumpstarter control
Jumpstarter USB3 storage
NVIDIA TOPO USB Controller
NVIDIA Flashing USB port
Wiring table
Name
AGX Connector
Jumpstarter Connector
Host connector
Comments
GND
(J42) pin 1
(I/O) GND
Connecting signal ground
/FORCE_REC
(J42) pin 2
(I/O) CTL_A
Force recovery mode signal (active low)
/POWER
(J42) pin 3
(I/O) CTL_B
Power down [>10s], Power up [short] (active low)
/RESET
(J42) pin 4
(I/O) RESET
Reset signal (active low)
AUTO-POWER
J42 / pin 5 to 6 jumper
Auto power-on jumper must remain connected
RCM
(10) USB-C connector
USB
NVIDIA Flashing interface for RCM
TOPO Console
(9) USB Micro B conn
USB
NVIDIA TOPO interface (consoles and boardctl)
DUT-STORAGE
(12) USB 3.2 Gen1
J8
USB storage attachment to DUT
DUT-POWER
(4) Power USB-C
J5
Power output for the DUT
ETHERNET
(6) Ethernet
Connect to a network where the host is also connected
JUMPSTARTER
P1 USB-C
USB
Jumpstarter control USB bus, used by the jumpstarter software to talk to the
dutlink-board
HOST-STORAGE
J7 USB-B 3.0
USB
Host access to USB storage, used to write the USB disk
DISK
J9 USB-A 3.0
Connect a pen-drive or disk here. USB3.1 Gen1 (5Gbps recommended, Gen2 10Gbps don't work well yet)
POWER-4-DUT
J1 USB-C PD
Connect the Orin AGX Devkit power adapter here
Troubleshooting
My console doesn’t show anything
See the Console access section and associate the TOPO USB console to your board.
My DUT doesn’t power on
Check that the AUTO-POWER jumper is connected.
See Know issues and limitations you may need to flip the USB-C cable going to the AGX board or the power adapter USB-C.
My console shows garbage during boot
There is a known issue with the TOPO USB console, where it will show garbage after power-on, then it
recovers. To avoid this issue, we recommend using jumpstarter firmware > 0.06 and
configuring the power sequencing as described in Power sequencing.
The system won’t boot from the USB disk
You need to go into the UEFI BIOS and change the boot order to setup “new devices”
as the first boot option. Make sure that the USB devices is found.
Make sure that you are not using a USB3.1 Gen2 device (10Gbps), as this is not supported yet.
Power sequencing
The Orin AGX Devkit has an automation header that can be used to control the power
and reset of the board. The dutlink board can be used to control the power
and reset of the Orin AGX Devkit in addition to the analog power control.
This is useful to workaround the isue described in My console shows garbage during boot, since the NVIDIA TOPO USB controller has a bug
that will corrupt the console during first boot after power-on on some usb hosts. With
this feature we can avoid power cycling the topo chip but still controll power-on/off
of the board.
To let jumpstarter know that it must look up for a specific usb serial port device
when trying to interact with the DUT console you will need to associate the
NVIDIA TOPO USB Console to your dutlink board using the
usb-set-console command.
i.e. when the Orin AGX TOPO console shows up like this on the host:
[300810.229025] usb 1-1.3.1: new full-speed USB device number 27 using xhci_hcd
[300810.332797] usb 1-1.3.1: New USB device found, idVendor=0955, idProduct=7045, bcdDevice= 0.01
[300810.332799] usb 1-1.3.1: New USB device strings: Mfr=1, Product=2, SerialNumber=3
[300810.332800] usb 1-1.3.1: Product: Tegra On-Platform Operator
[300810.332801] usb 1-1.3.1: Manufacturer: NVIDIA
[300810.332801] usb 1-1.3.1: SerialNumber: TOPOD83B461B
You should associate it to the dutlink board using the following command:
Must be connected to pins GND, CTL_A, CTL_B and /RESET of the dutlink board I/O connector.
This USBC connection is used for flashing, and must be connected to the host via USB.
Jumpstarter needs to be connected to the host via J7 and P1. And the Orin power adapter must be connected to J2.
3.1.4 - RPi4 + jumpstarter
Manual for connecting the dutlink board to the RPi4.
3.1.5 - VisionFive2 RISC-V + jumpstarter
Manual for connecting the dutlink board to the VisionFive2 RISC-V board to jumpstarter.
4 - Tutorials
Show your user how to work through some end to end examples.
In this page you will get complete interaction examples with Jumstarter, from the very beginning to the end.
4.1 - Jumpstarter in Tekton
In this section we explain how to use Jumpstarter in OpenShift pipelines.
We can integrate with OpenShift pipelines/tekton by using a tekton task co-located with the hardware.
Tekton is an open-source, cloud-native framework for creating and managing CI/CD workflows, enabling automation of software build, test, and deployment pipelines on Kubernetes. It’s designed for flexibility, scalability, and supports various development tools and languages across different cloud environments.
To use Jumpstarter in Tekton, you need to create a custom task (see jumpstarter-script task for an example), and then use it in your pipeline.
The directory provides an example pipeline, and a custom task to use Jumpstarter in Tekton.
Pipeline diagram
The git-clone task checkouts a repository which contains a jumpstarter script, and an ansible
playbook. The jumpstarter script uses the ansible playbook on a later stage, when the
DUT is already powered, booted, and connected to the host to perform more complex tasks.
The prepare-image task is an example task performing some initial preparation of the image
we want to deploy on the DUT.
We will focus on the run-jumpstarter-script task, which is the one that uses Jumpstarter.
This task receives the following parameters:
And the following workspaces:
scripts is the base directory for the scriptFile reference. This is where we would usually
checkout a repository containing the scriptFile.
images is the base directory for the imageFile reference. This is the workspace where
preceding pipeline tasks would have copied the image to deploy on the DUT.
artifacts is the directory where resulting task artifacts will be copied to. We expect
the jumpstarter script to generate any artifacts in the artifacts diretory which will be copied to the artifacts workspace.
Calling our example pipeline from command line can be performed with:
The current implementation is not aware of the nodes where test harnesses could be attached (i.e. if there is a direct physical connection from host to hardware like in the dutlink board).
Some future test harneses could be network-driven, that would remove this limitation. Or future jumpstarter arquitectures could be accessed via a broker. A temporary solution
could be to use a nodeSelector to make sure the tasks are scheduled in the node(s) where
the hardware is available. But that would not fully acount for scheduling/availability.
Future work
To address test harness allocation and pod scheduling we are looking into the following options:
Device plugin API: this is the simplest solution, although the least flexible, since there
is a 1:1 usage mapping between pods and devices. Some test-harnesses could allow multiple
pods accessing the same device, i.e. when there is a (CAN) bus or network involved.